Adding a new user
After your initial setup you may wish to continue expanding your Ooma Office for WeWork system beyond your first users. Each new user comes bundled with a phone number, private voicemail box, and personalised access to the Ooma Office End User Portal.
Keep in mind that when you are opening the webpages indicated in this article you will need to log in as an administrator.
- How can I create a new user?
- How much does it cost to add a new user?
- How can I see what devices are currently assigned to a user?
- How can I update a user’s voicemail preferencesEach extension will have its own voicemail settings that can be configured to the user’s preference. You can set up these preferences by following these instructions:
- How can I update a user’s call forwarding settings?
- How can I change the outgoing caller ID for an extension?
- How can I assign or update a user’s direct access phone number?
- Can a user have more than one direct access phone number?
How can I create a new user?
You can set up a new user by following these instructions:
- Log in to your Ooma Office Manager at http://office.ooma.co.uk/ and navigate to “Extensions” under the “Setup” tab.
- Click on the “+Add User” button.
- Fill out the required information for the new extension, including selecting a new phone number and choosing a new extension number.
- Click “Proceed” to create your new user.
Once your extension is set up, you can add direct access phone numbers and extension access methods. In addition to an IP phone, Ooma Office for WeWork can also forward to a remote number. This can be a mobile phone or a landline number that will receive forwarded calls from the Ooma Office extension.
How much does it cost to add a new user?
Each new user costs £33.00. You can learn more about pricing for Ooma Office for WeWork by visiting our pricing chart.
How can I see what devices are currently assigned to a user?
You can check what devices are assigned to a user by following these instructions:
- Log in to your Ooma Office Manager at http://office.ooma.co.uk/ and navigate to “Extensions” under the “Setup” tab.
- Click on the user whose devices you would like to check.
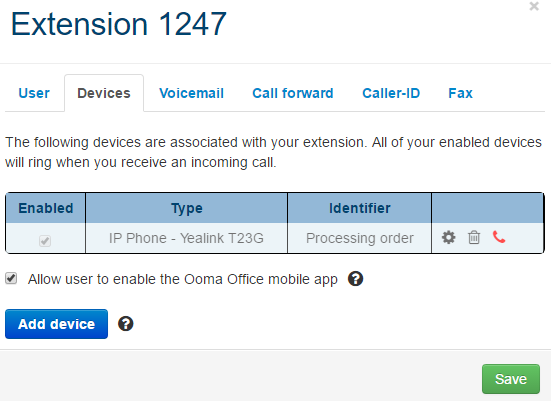
- Click on the “Devices” tab in the pop-up to get a list of devices that are currently assigned to the user’s profile:
How can I update a user’s voicemail preferencesEach extension will have its own voicemail settings that can be configured to the user’s preference. You can set up these preferences by following these instructions:
- Log in to your Ooma Office Manager at http://office.ooma.co.uk/ and navigate to “Extensions” under the “Setup” tab.
- Click on the Settings button in the row of the extension that you wish to modify.
-
Click on the Voicemail tab and set up your voicemail preferences:

You can update the following settings:- Voicemail enabled: Turns extension voicemail on and off.
- Voicemail pick up time: How long your extension’s phone(s) will ring before rolling to voicemail.
- Voicemail PIN: The numeric code the user will use to check the extension’s voicemail.
- Enable voicemail to email notifications: Sends an email to the user’s address to let them know when a new voicemail comes in.
-
After email notification: Determines what happens to a voicemail message once an email notification has been sent:
- Keep the message marked as new
- Mark the message as heard
- Delete the message
- Save your changes.
How can I update a user’s call forwarding settings?
Each user will have their own call forwarding settings that can be configured to their preference. You can set up call forwarding by following these instructions:
- Log in to your Ooma Office Manager at http://office.ooma.co.uk/ and navigate to “Extensions” under the “Setup” tab.
- Click on the Settings button in the row of the extension that you wish to modify.
-
Click on the Call forward tab and set up your preferences:
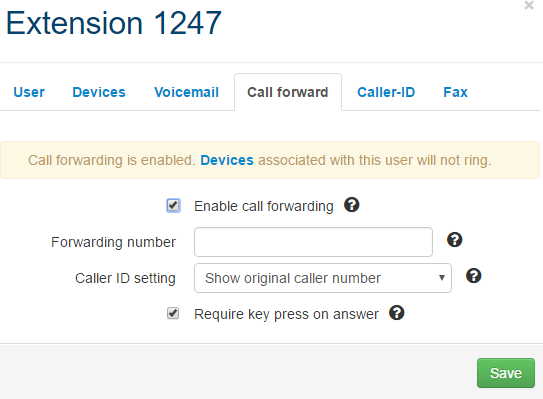 You can update the following settings:
- Enable Call Forwarding: Toggles call forwarding on and off.
- Forwarding number: The external phone number that all calls will be forwarded to.
- Simultaneously ring local extension: When call forwarding is toggled on, local phones will still ring.
- Require key press on answer: When a call rolls to an external number, you must press 1 to answer it when picking up the phone. Turning this setting on ensures that calls will only roll to the user’s Ooma Office voicemail if the forwarded call is not answered.
- Save your changes.
Keep in mind that when call forwarding is enabled it will override all of your other extension settings. To revert to your original settings, turn call forwarding off.
How can I change the outgoing caller ID for an extension?
You can change the number that appears on an extension’s outbound caller ID by following these instructions:
- Log in to your Ooma Office Manager at http://office.ooma.co.uk/ and navigate to “Extensions” under the “Setup” tab.
- Click on the Settings button in the row of the extension that you wish to modify.
- Click on the Advanced tab and set up your preferences.
- Select the number you would like from the dropdown menu.
- Save your changes.
How can I assign or update a user’s direct access phone number?
You can assign or change the direct phone number(s) assigned to a user by following these instructions:
-
Log in to your Ooma Office Manager at http://office.ooma.co.uk/ and navigate to “Phone Numbers” under the “Setup” tab. You will see a table like the one below with one entry for each of your business’s phone numbers:
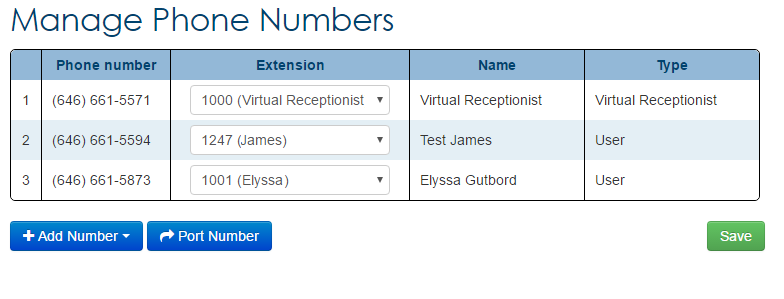
- To change the extension that a phone number connects to, select a new user from the dropdown menu under Extensions.
- Click “Save” to update your phone number mapping.
Can a user have more than one direct access phone number?
Yes, you can assign multiple direct access phone numbers to a single user. You can choose additional phone numbers under the “Numbers” option in the “Setup” tab. Additional phone numbers can be assigned to ring groups, users, the Virtual Receptionist, and the conference server.